

Butterfly Floor Rug Pattern
Price range: $15.00 through $19.00The Butterfly Floor Rug Pattern measures 40″ x 30″ (100cm x 76cm) once complete. This beautiful design is unique in that it encompasses both jelly roll strips and soft and fluffy hand-made chenille.
This rug is sure to delight your little ones, and is perfect for any child’s playroom or bedroom. You can make it in any colour combination you desire; Even using up your stash of jelly rolls or fabric strips that you can cut selvedge to selvedge.
The Pattern takes you through how to quickly and easily make the jelly roll strips using our Jelly Roll Sasher Tool, and making binding with our 1 1/4″ Sasher Tool. In addition, you’re given step-by-step instructions on how to make your very own chenille fabric for the butterfly body. Chenille is a beautiful touch that really completes this floor rug! The butterfly pattern sheet is included for your use.
** You can purchase either a downloadable PDF or the physical Pattern (please select the relevant option from the dropdown menu below the video). ** Please note – if purchasing the downloadable PDF, the Pattern can be printed as an A5 booklet or on A4 pages. However, the Butterfly Template Sheets must be printed as an A4 size (this is the size provided with the physical Pattern). If you live outside Australia, please google paper sizes to ensure you print your Pattern and Template Sheets on paper that is an equivalent size to Australia’s (or print to ‘actual size’ if paper is larger).
The Butterfly Floor Rug Pattern Requirements
- Chenille rotary cutter
- Chenille brush
- Jelly Roll Sasher Tool
- 1 1/4″ Sasher Tool
- Strong sharp scissors
- Roxanne Glue Baste It
- MonoPoly thread
- ¼” Foot for your sewing machine
- Ditch Stitching Foot for sewing machine
Fabric and Batting Requirements
- 1 ½” Jelly roll packs (40 + 2 ½” strips in each)
- 3 x Fat ¼’s to blend with the jelly rolls
- 1 Fat ¼ to contrast the jelly rolls
- 2 metres of Hobbs Heirloom Double Sided Fusible Batting cut into 2 ¼” strips (around 140cm will be needed) Note – the pre-cut batting has been discontinued.
- Contrast or matching thread
Watch as Pauline shows you how to make the Butterfly Floor Rug.
[embed]https://youtu.be/YKAIGMrWYQA[/embed]
Superior Titanium Coated Topstitch Needles 80/12
$18.50Superior Titanium Coated Topstitch Needles 80/12 are the best of the best of sewing machine needles. They are designed to elevate the stitching experience across a variety of sewing and quilting projects.
The titanium coating means these needles will stay sharper for so much longer. This ensures consistent and precise stitching throughout extended use. The titanium coating not only enhances durability but also provides resistance to corrosion. This makes them a reliable choice for both everyday sewing tasks and intricate quilting projects.
The Topstitch needle type has a larger eye and deeper groove. That allows for smooth thread flow and reduces the risk of skipped stitches. This makes it ideal for a wide range of applications including piecing, quilting, embroidery, appliqué, and general construction. Whether you’re working with delicate fabrics or multiple layers of quilting cotton, these needles deliver exceptional performance and reliability.
Investing in high-quality needles like the Superior Titanium Coated Topstitch Needles 80/12 is one of the simplest and most cost-effective ways to enhance the overall quality of your sewing projects. Even the most advanced sewing machines can’t perform optimally if paired with subpar needles. By using needles that stay sharp significantly longer, you not only improve the precision and consistency of your stitching.
Each packet of Superior Titanium Coated Topstitch Needles contains five needles, sized #80/12. This standard size is versatile enough for most sewing tasks, making it a staple for both beginner and experienced sewists alike.
Superior Titanium Coated Topstitch Needles 80/12 exemplify the fusion of advanced technology and practical craftsmanship, offering sewists and quilters a reliable tool that enhances stitching precision, durability, and overall sewing enjoyment. Whether you’re quilting a masterpiece or sewing everyday garments, these needles ensure that your projects are completed with the utmost quality.
Each packet contains five needles, size #80/12
Also available as 70/10
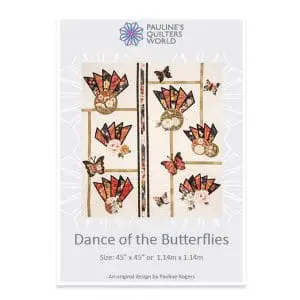
Dance of the Butterflies Pattern
$15.00The Dance of the Butterflies Pattern was designed by Pauline Rogers, and is a Quilt As You Go quilt. Once finished it measures 45″ x 45″ or 1.14m x 1.14m.
Constructed in panels, you quilt the background first, then appliqué and join the quilt together. All of the black trim around the fans are made using the 1/4″ Sasher. The sashing is a triple up (three separate layers) using three different sized Sashers. This gives a beautiful and interesting effect to the quilt.
** You can purchase either a downloadable PDF or the physical Pattern (please select the relevant option from the dropdown menu below the video). ** Please note – if purchasing the downloadable PDF, the Pattern can be printed as an A5 booklet or on A4 pages. However, the Butterfly Template Sheets must be printed as an A4 size (this is the size provided with the physical Pattern). If you live outside Australia, please google paper sizes to ensure you print your Pattern and Template Sheets on paper that is an equivalent size to Australia’s (or print to ‘actual size’ if paper is larger).
Dance of the Butterflies Quilt Pattern Requirements
- Fork Pins
- Large Sasher Collection – Set of 10
- Roxanne Glue Baste-It
- MonoPoly Thread
- Sharp Scissors
- Mesh Transfer Canvas
- Bohin Fabric Marking Pencil Set
- Titanium Topstitch Needles #80/12
- 2B Lead Pencil and Eraser
- Sheet Template Plastic
- Threads to match the fabric
Fabric and Batting Requirements
- 2m (2 1/4 yds) Backing fabric, sashing and outside binding
- .6m (3/4 yd) Two different print fabrics for fans and two sashings
- .4m (1/2 yd) Contrast fabric for lattice
- .5m (3/4 yd) Black fabric for bias (or colour of choice)
- .5m (3/4 yd) Print fabric for fussy cut flowers and circles
- 2m (2 1/4 yds) Backing fabric
- 1.4m x 1.4m (1 1/2 x 1 1/2 yds) Hobbs Fusible Batting/Wadding
Watch our below video as Pauline shows you how to make the Dance of The Butterflies Pattern and the Rectangles Rock n Roll Pattern using one of her Quilt As You Go techniques.
[embed]https://youtu.be/SQXSMprfcyM[/embed]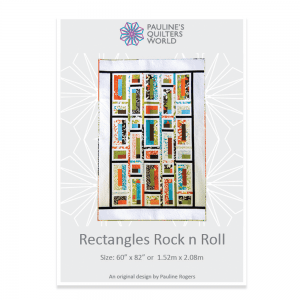
Rectangles Rock n Roll Pattern
$15.00The Rectangles Rock n Roll Pattern was designed by Pauline Rogers, and is a Quilt As You Go quilt.
You’ll start by piecing each block, then quilting each block, and finally joining together using Pauline’s QAYG Back To Back technique. You will quilt the borders before joining them to the quilt.
Once complete, the quilt measures 60″ x 82″ or 1.52m x 2.08m.
** You can purchase either a downloadable PDF or the physical Pattern (please select the relevant option from the dropdown menu below the video). ** Please note – if purchasing the downloadable PDF, the Pattern can be printed as an A5 booklet or on A4 pages. If you live outside Australia, please google paper sizes to ensure you print your Pattern on paper that is an equivalent size to Australia’s (or print to ‘actual size’ if paper is larger).
Rectangles Rock n Roll Quilt Pattern Requirements
- Fork Pins
- 1″ Sasher Tool
- 1 1/4″ Sasher Tool
- Roxanne Glue Baste-It
- MonoPoly Thread
- Sharp Scissors
- Neutral thread for piecing
- Thread to match backing
Fabric and Batting Requirements
- 4.4m (5 yds) White homespun
- 1m (1 yd) Black homespun
- 1 x Jelly roll with 2 of each colour strips
- 5 x Fat 1/4’s – plain fabrics to contrast the jelly roll
- Scraps for backing (if buying you need 3.5m (4 yds) of 115cm (45″) wide fabric
- 2.5m (2 1/2 yds) Hobbs Fusible Batting/Wadding
Watch our video where Pauline explains how she makes the Rock n Roll Quilt and the Dance of the Butterflies Quilt, using her two different Quilt As You Go techniques.
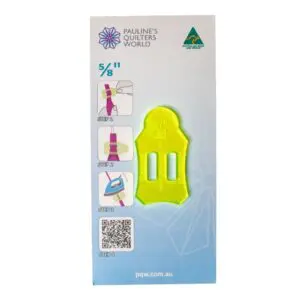
5/8″ Sasher
$12.00Our 5/8″ Sasher™Tool is PQW’s version of a bias maker. It allows you to quickly and easily fold bias or straight grain fabric strips in half (raw edges together) or perform a perfect bias fold using just the Sasher Tool and an iron.
Use the 5/8″ Sasher Tool to make stems and vines for applique, sashing strips for Quilt As You Go quiltmaking, bias tape for celtic or stained glass applique and bag handles.
You will notice that the sides of the Sasher have a curved shape. This is so the curved edge of an iron can neatly fit against the Sasher as you push it along; Which means no more burnt fingers!
Please note – that the size on the Sasher tool is the finished size of the folded strip. If you require a 5/8″ finished size, cut the fabric 1 1/4″ wide and then put through the 5/8″ Sasher.
Making Face Mask Ties
In addition, our 5/8″ Sasher Tool is the perfect size for making ties for face masks. Please follow the step-by-step instructions below. You can also purchase our Face Mask Creative Set, which includes the Template Ruler for making the actual face mask.
Step 1: Cut strips across width of fabric 11/4” wide.
Step 2: Lay the fabric wrong side up on ironing surface.
Step 3: Fold both sides of fabric in until they meet in the centre, press first 11/2”.
Step 4: Thread fabric strip up from the bottom of the Sasher, then over the bar and back down. Making sure the fold is facing up.
Step 5: Pin the end of the fabric strip into ironing surface with a Fork Pin. This gives even tension on each side of the strip and stops any stretching as you iron.
Step 6: Put the side of the iron into the curve of the Sasher tool. Push the tool with the iron as you guide the sides of the strip with your fingers. Move the pin about every 15” of pressing to eliminate stretching of fabric.
Step 7: You are now ready to sew the strips along the folded edge of the mask and along the length of the tie by top stitching all along the edge you just pressed.
Watch our Youtube video where Pauline shows you just how easy it is to use the Sasher Tools.
[embed]https://youtu.be/_AuXMMfMwtM[/embed]